Thursday, April 30, 2009

Masking


Masking technique
From lesson


*gives your image extra texture and depth to your image, while keeping the images clean layout on your page or card.
*layer your stamps (for ground and back ground)
*make different parts of you stamps different colors
*Take out parts of your stamps you don’t want
Basic Masking:
1) Stamp your image onto your cardstock.


From lesson


2) Ink image again (if using outline and filler images just pick one) and stamp on to a sticky note.
*be sure to stamp towards the top of the sticky so that the sticky will be on the back of your image.


From lesson


3) Cut around sticky note stamped image (as closely to the image as possible). This is your “mask”.
4) Position mask over stamped image. The sticky will help keep it in place.


From lesson


From lesson


5) Stamp background images over mask . (in this case the leaves). The ctmh clear stamps makes placing the background image easy!


From lesson


From lesson


6) Remove mask to reveal layered images.
The leaves are now behind the flower.


From lesson


*note – if you don’t use a sticky note, be sure to use light weight paper instead of cardstock for the mask.


From lesson


Reverse masking:
1) Stamp the entire image on a sticky note or thin paper.


From lesson


2) Carefully cut away the portion you don’t need. This becomes the mask.

From lesson

3) Lay the mask on your project. Ink the stamp and stamp it directly on the mask, matching up the cut-out image.


From lesson


4) Fill in the extra space you created with another stamped image or accent.


From lesson


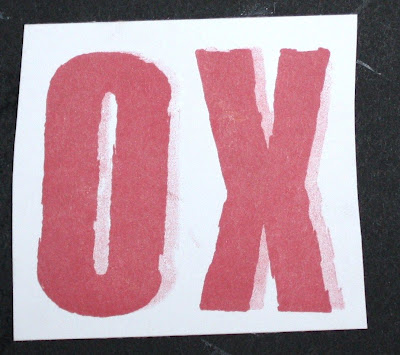
Reverse masking for different colors:
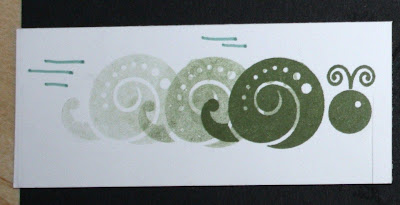
1) Using either a sticky note or thin paper, stamp your image onto the mask paper. (stamp the image as many times as the number of colors you will be using). Ie – snail – green and pink, so stamp the image twice.


From lesson


2) On one of the images cut out the part of your image you want to be one color. (i.e. the turtles shell)
3) On the next image cut out the other part on the other stamped mask. (i.e. the turtles legs, tail, and head)
4) Place one mask over the area you want your image. (ie – the mask with the shell cut out). Ink the image in the color desired (ie- pink) and stamp your image over the mask. (only the pink shell comes through onto your project)
**looking throught the ctmh clear stamp and block, it is easy to line up your image.


From lesson


5) Place the next mask over the stamped image on your project (ie – place the mask with the open legs, tail, and head over the shell). Ink and stamp your image over the mask (ie – ink with green and the legs, tail, and head go next to the shell)


From lesson


From lesson


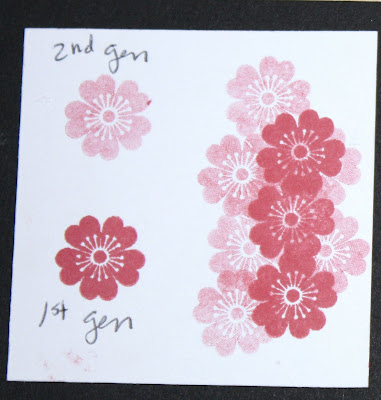
Sample card*** When grouping flowers you may have to make 2 masks for each flower.


From lesson


Reverse Masking for sponging or shading:
1) Stamp the image onto thin paper. If you will be sponging different areas different colors, stamp image for each number of colors. IE – pumpkin base and pumpkin steam will be two different colors. Stamp the pumpkin twice.
2) Cut out the portion of the image you will be sponging or shading. IE – one one cut out the steam, on the other image the base. This is your mask.


From lesson


3) Position mask over the image on your project and shade in the space. This creates a crisp shaded image.


From lesson


**NOTE: This took a lot of time. If you are into shading and blending colors, it might be worth it. If you just want to color the inside of your stamped image I recommend using the blending pen or watercolor pencils. : )

Words:
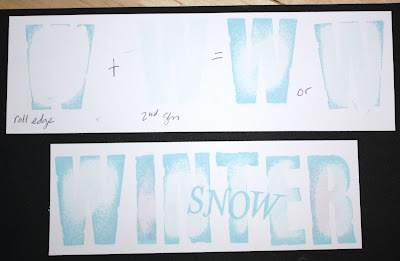
*use the reverse technique to make words different colors.

From lesson


step 1) Stamp onto a regular (non cardstock) piece of paper. For each color you want your stamp in, stamp that many times. In this picture I have 5 different colors (don't forget to include the black)- so I stamped it 5 times.
step 2) pick a color for each stamped part and cut out the phrase or words you want in that color.
Continue for each color

From lesson


step 3) align the first phrased section as desired and stamp with the color for that phrase/word. Then continue with each phrase/word in their colors. Be sure to wash and dry the stamp inbetween each color!!


**You can also use this technique to move words into a different shape then the stamp. IE – you have a stamp set that looks like this:

I AM SO BLESSED TO HAVE YOU
AS A FRIEND!

Use the mask technique to make it look like this:
I AM SO
BLESSED
TO HAVE
YOU AS
A FRIEND!

For example:

From lesson


Notice my quote on this page:

From lesson


I wanted to fit the two lined phrase stamp into a circle shape. Also I wanted the words Knight and Mine to stand out.

Here is a picture of the paper I used to do this:

From lesson


From lesson


I cut out the sections that I wanted together in the circle. Also I cut out the words I wanted to be a different color. I traced the circle onto my cardstock. Then I lined up each section as I went and stamped with the desired color.

I know this takes a little more time. But if you want to make your pages ( or eve just your extra special pages) look a little more professional then this will be worth it to you! It is to me!

Some more samples of this technique:

It's easier to cut out these leaves only once or twice for a mask - then to cut out three or four stamped ones and try to arange them.

From lesson

It was MUCH easier to cut out the balloon two times for a mask ( and one for reverse mask) then to cut out 20 tiny ballons and try gluing those on!

From lesson

This card was REALLY EASY!! I only had to cut out 1 butterfly mask to cover the one over lapping butterfly. Also this was the card we made at the gathering - along with the turtle and yellow daisies at the top!

From lesson

Wednesday, April 15, 2009

Here are the cards from the last swap. Bring your cards to the MAY gathering and trade them like trading cards!

From Jenny Ng:
From other


From Joan Vaughan:
From other


From Nicki Vikdal:
From other


From ME!
From other
Click on the button - scrap and share - to the left to enter into some awsome contest with CTMH!
Our April technique lesson will be on Masking. Here is the teaser:

From lesson


Using the masking technique I was able to make her dress a different color, but have it appear smooth, like a single stamp.

From lesson


These ladies are also a teaser for the stamp of the month in May (the Summer Idea book!!)
From lesson


I have made her hate a different color
From lesson


Note: "the secret to staying young" is not part of this stamp set - I purchased it in the discount section of my website.

Wednesday, April 1, 2009

In honor of National Scrapbooking Month, CTMH is tickled pink to share this special paper pack. You will be just as tickled when you see the fun glitter pages, wonderful colors, and the cute stamp set! Each pack comes with the following:
1 – My acrylix “I Am” Stamp Set (D-size)
2 – 12x12 floral B&T paper (1 with glitter)
2 – 12 x 12 striped B&T Duos Paper (1 with glitter)
1 – 12x12 Blush textured Cardstock
1 – 12x12 Crystal Blue Textured Cardstock
5 – 12 x12 white daisy textured Cardstock ( 1 sheet with die-cut shapes)
1 – Mini-medley accents white daisy collection
1 – Foam texture tool
1 - Brochure

How can you get this wonderful set you might ask? It’s simple: Spend $60 in stamps and get the Tickled Pink set free! Or purchase this set for $34.95 – well below retail value! If you host a gathering and your party makes a minimum of $400, then the hostess gets it free.
This special will be available April 15th through May 31st!
click on the flyer above.


2nd Generation Stamping

Benefits of 2nd G stamping:
- Extends your color palette with a lighter version of your ink colors
- It’s a great way to a get a perfectly coordinated 2nd color on your project.
- Great technique for your filler and out-line CTMH stamps

How to do it: Load image with ink. Stamp once on project or scrap paper. Then without
re-inking image, stamp it a second time on your project.


Card sample:


Filler and outline stamps
CTMH stamps often come with a filler and an outline stamp on a set.

1) Place outline stamp on your block. Load image with ink. Stamp directly on to the project.
2) Place filler stamp on block. Load image with ink. Stamp once onto scratch paper. Then without re-inking, stamp inside the out-lined image.


Tip: when ever stamping out lines and fillers, I find it is easiest to stamp the darker image first. It is easier to see the darker image when lining up the next stamp.
Card Sample:


Mix and match the out line and filler stamps with the different generation levels:
x

For a falling look with depth use out line, filler, and different generation levels.


Mix and match different colors and different generation levels:

Card sample


Shadow technique:
1) Stamp the image onto the project (1st generation)
2) Without re-inking stamp the image again to the side of the first image like a shadow (2nd generation)


Card Sample:


Add depth to a grove of trees, or a feild of flowers:


change the depth of your shadow


For a speeding look ( i.e. car driving) – without re-inking stamp again to the side of the shadow (3rd generation)

Card sample:


Alphabet with 2nd generation
Use two sizes of fonts.
1) Stamp the smaller font size first ( i.e. always)
2) Stamp the larger size font over the smaller font using 2nd generation.( i.e. LOVE)
This will create a layered image that says LOVE always


Variation:
Roll your letters so that only the edge touches the ink pad. Stamp letter. Second generation stamp the inside of the rolled edges.


On cardstock
I love the look of 2nd generation on colored cardstock.
· Use either the same (or similar) color or a different color completely.
· I also love to sand down the CTMH cardstock and 2nd generation stamp designs onto the sanded paper for a unique distressed look.(be sure to blow off any excess cardstock dust before stamping)


Card sample:


Kissing technique
Pick two stamps. One should have a design (A) and the other should be a solid shape (B).
1) Ink up stamp B (solid stamp). Do not put ink onto stamp A - leave it dry.
2) Take stamp B and stamp it onto stamp A (design); as if the stamps are “kissing”
3) Now take stamp A and stamp it onto the paper. This should leave the design in the shape of the solid stamp.
4) Now take stamp B (solid stamp) and re-ink it. Stamp it once onto scrap paper, then over the design from stamp A. (2nd generation stamp the solid stamp over the design left by stamp A)
· After step 2 you can take stamp B and stamp it onto paper for a different look.


Card Sample:


I love how easy and versital second generation stamping is.