Embellishments: Ribbon
(All prices and page numbers refer to the summer 2009 Idea Book)
http://create.myctmh.com/MyCTMH/ProductHighlights.aspx?PageId=180
(All prices and page numbers refer to the summer 2009 Idea Book)
http://create.myctmh.com/MyCTMH/ProductHighlights.aspx?PageId=180
CTMH Ribbon: (page 91)
Organdy: Sheer ribbon.
• You can use any ink color to change the color of white daisy organdy ribbon. Using sponge daubers (page 100 $3.95), lay daisy white organdy ribbon over the ink pad and push the ribbon into the ink pad. Move ribbon across ink pad and continue pushing with sponge. Let dry before handling.
Organdy: Sheer ribbon.
• You can use any ink color to change the color of white daisy organdy ribbon. Using sponge daubers (page 100 $3.95), lay daisy white organdy ribbon over the ink pad and push the ribbon into the ink pad. Move ribbon across ink pad and continue pushing with sponge. Let dry before handling.
Grosgrain: woven regular ribbon.
• You can stamp any design/words/letters onto the grosgrain ribbon. I recommend using white daisy for true color. Let dry before handling. (sample on page 59 “grin and bear it”)
1) Bulk Ribbon: $6.95
• The ribbon comes in basic colors; daisy white, colonial white, cocoa, black, and cranberry. Each roll has 20 to 25 yards.
• Great for saving money.
• Start with bulk ribbon if you are overwhelmed by all the color options. I recommend Cocoa grosgrain and daisy white grosgrain and/or organdy.
2) Designer ribbon rounds
• Excluding the black collection and ricrac, the ribbon rounds come with 4 different styles, 6 feet of each, for a total of 24 feet of ribbon. $7.95
• Look at the paper you like, is there a common color? Is there a color you tend to like?
• Black collection and ric rac come with 5 designs, 4 feet of each design for a total of 20 feet.
• Excluding the black collection and ricrac, the ribbon rounds come with 4 different styles, 6 feet of each, for a total of 24 feet of ribbon. $7.95
• Look at the paper you like, is there a common color? Is there a color you tend to like?
• Black collection and ric rac come with 5 designs, 4 feet of each design for a total of 20 feet.
3) Sassy strands: $3.95
• Each set comes with 6 different colors, 16 feet total (so a little over 2 feet each)
• The sets are divided by the same colors from the color wheel on page 10 & 11
• Read carefully to make sure you are getting the texture you want: lacy chain, loop, or chenille (see picture on page 91)
Store your ribbon with the Ribbon Rounds Organizer on page 104. $22.95
***********************************************************************************
Ribbon is my 2nd favorite embellishment. It adds a lot by doing just a little.
Remember to #1 Rule for embellishments – BREAK IT DOWN! The next time you look through the idea book (or any other magazine) ask yourself “What did they do with the ribbon?” Ignore all the other embellishments on the page and just look at the ribbon. If they involved another embellishment (like a brad, staples, ect) then look at how they work together.
Gluing Ribbon Down:
1) Glue dots. Press the ribbon against the glue dot, and then pull the glue dot off the packaged paper. Stick onto page as desired. Great for bows, knots and smaller pieces.
2) Tombo (aka double sided tape dispenser). Run tombo along ribbon. Place ribbon on page as desired. Great for long pieces that you want to stay straight.
Basic simple ways to embellish with ribbon/Sassy strands.
a) Across the page with a bow/knot. This is the #1 easiest ways to use ribbon. Scrapbook samples: 19, 31, 35, 61, 83, 88. Card samples: 23, 31, 35, 57, 64, 65, 72, 81. Ric rac samples: 62, 73, 74.
• You could also tie several knots along the ribbon, then place the ribbon down.
 |
| From ribbon |


| From ribbon |

b) ¾ across the page ending with a knot. This is a variation of (a). Simply tuck one end around the edge of the paper, then cut the ribbon ¾ away across and tie the end in a knot. pg 19, 75.


c) Just bows or knots. Tip: If you can’t seem to tie a nice bow – then don’t. Simply tie a knot instead – it looks just as cute as a bow! Tie just a bow/knot and place it on your page/card. Place it along corners, along thin strips of paper, on stickers or stamped images, or on part of an alphabet. Pg 47, 57, 62, 65.
 |
| From ribbon |
 |
| From ribbon |
 |
| From ribbon |
d) Little tabs: Simply fold a small amount of ribbon in half like a “v” and attach to page. Glue behind photo, frame, image, ect. See ribbon with embellishments for more tab ideas. Attach at the point for a “v” shape or at the ends for a different look – pg 70 “you did it card”.
 |
| From ribbon |
 |
| From ribbon |
 |
| From ribbon |
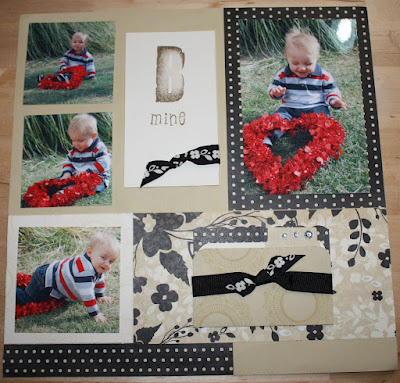
e) Along the bottom and/or top of a title or section. Page 27.
 |
| From ribbon |
 |
| From ribbon |
 |
| From ribbon |
f) Hold the sides of a quote/title/greeting/image/journaling. Pg 34, 59, 81
g) Use to bind card or mini photo album ect. Punch holes in side of card and tie ribbon through. Pg 35.
h) Place a thinner strip of paper over the ribbon. Pg 47. Place a different color of sassy strand along the ribbon for a layered look. Pg 61 top left
i) Hide half of the ribbon under the edge of paper for a layered look.
• I especially like doing this with the wider ric rac for a wavy look.
Ribbon with other embellishments:
a) Brads
• Brads on ribbon. After you have attached your ribbon to your project, use a piercing tool to poke a hole through the ribbon and paper. Place brad through hole and set. Pg 68 top right.
• Decorate with an odd number of brads.
• Lay the ribbon across page/card. Then pinch the ribbon in-between the legs of the brads – then attach brads.
• Brads on ribbon. After you have attached your ribbon to your project, use a piercing tool to poke a hole through the ribbon and paper. Place brad through hole and set. Pg 68 top right.
• Decorate with an odd number of brads.
• Lay the ribbon across page/card. Then pinch the ribbon in-between the legs of the brads – then attach brads.
 |
| From ribbon |
 |
| From ribbon |
 |
| From ribbon |
 |
| From ribbon |
b) Photo hangers (page 95. $14.95 for 48 hangers in 6 different colors.)
• Place photo hanger along side of quote/photo/journaling/, lace ribbon through hanger part and lay along rest of page. Pg 66 bottom right.
• Place two photo hangers – one on each end of quote, title, ect – and lace ribbon through. Pg 81 bottom left.
• Tie a knot on the photo hanger. Pg 67, 80
• Create a “v” shape by lacing it through the hanger then to top (or side). Page 77
• Use the photo hanger to hang a stamped image from the center of a knot/bow. Pg 81 bottom right.
• Make a “buckle”. String ribbon through hanger then have shorter end held down by a brad.
 |
| From ribbon |
 |
| From ribbon |
 |
| From ribbon |
 |
| From ribbon |
 |
| From ribbon |
c) Edge anchors (found on page 94 $5.95 per set).
• Place the edge anchor along the edge of the paper. Tuck the edge of the ribbon into the edge anchor. Using your piercing tool, pierce into the whole, through the ribbon and paper. Place brad into hole and set brad. Pg 48 I miss you card.
 |
| From ribbon |
 |
| From ribbon |
 |
| From ribbon |
 |
| From ribbon |
d) Eyelets ( found on page 94 $3.95 per set of 100)
• After you have attached the ribbon to your project, use a crop-a-dile, to set the eyelets through the ribbon. A few options include eyelets along a strip of ribbon, or eyelets holding the “legs” of a ribbon or knots.
• First mark and set your eyelets onto your page. String ribbon from one eyelet to another.
• Set the eyelets up the way you would lace a shoe and then lace the ribbon through.
• Do eyelets equally along the page/card side and then lace through – over paper, then under, then over (like hand stitches).
 |
| From ribbon |
 |
| From ribbon |
 |
| From ribbon |
 |
| From ribbon |
 |
| From ribbon |
e) Mini medley accents collections (found on page 95 $7.95 each set).
• Lace through buckles, pg 46.
• Lace the ribbon through the swirl things. Tie a knot on the swirl thing ( winter cozy collection)
• See safety pins part(h)
 |
| From ribbon |
 |
| From ribbon |
f) Tags
• Place a photo hanger at the top of a tag and tie a bow/knot.
• Fold ribbon in half and staple in place.
• Fold ribbon in half and use a brad or eyelet to hold in place.
• Use a large brad and put ribbon through the eyelet.
g) Foundry frames and book plates (found on page 94 $3.50 to $4.95)
• String ribbon through the holes on the bookplates (instead of using the brads). Tie in place with a bow or know.
• Wrap around the edge of the frames and tie in place with a knot or bow.
h) Safety pins and Pretty Pins (found on page 92. Set of 12 for $4.25)
• Pin through the ribbon. Pin through the knot on a bow (or the knot) pg 35. Pin a stamped image (like a heart) through the pin and ribbon, pg 27 on photo cube.
i) Dimensional elements (page 96 price ranges). Decorate your d-elements with bows and knots. Wrap sassy strand or ribbon around a d-element. Some d-elements come with ribbon slides, see page 22 for a decorated example.
j) Buttons
• Glue a button to the center of bow/knot. Tie a small bow and glue to center of button. Pg 57
• Glue buttons along ribbon.
Ribbon’s with stamps/stickers:
a) Lay the ribbon across the page/card, and have stamped image/d-element overlap ribbon. Page 37, 47, 55, 64, 67.
b) Decorate your stamped characters with ribbon. Tie bows/knots around necks, on hats, holding a group of flowers – the possibilities are endless! Pg 71 bottom right.
c) Decorate letters. Page 62, 88
d) Stamp designs/words onto the grosgrain ribbon. See “Grosgrain” at the beginning.
• Glue a button to the center of bow/knot. Tie a small bow and glue to center of button. Pg 57
• Glue buttons along ribbon.
Ribbon’s with stamps/stickers:
a) Lay the ribbon across the page/card, and have stamped image/d-element overlap ribbon. Page 37, 47, 55, 64, 67.
b) Decorate your stamped characters with ribbon. Tie bows/knots around necks, on hats, holding a group of flowers – the possibilities are endless! Pg 71 bottom right.
c) Decorate letters. Page 62, 88
d) Stamp designs/words onto the grosgrain ribbon. See “Grosgrain” at the beginning.
 |
| From ribbon |
 |
| From ribbon |
 |
| From ribbon |
 |
| From ribbon |
 |
| From ribbon |
 |
| From ribbon |


 Posts
Posts


